We’re knee deep in surf, battling the water pulling our tripods out to sea, wind in our faces and the tide coming in? going out?… the sand shifting beneath our feet, I really can’t tell!
And we’re grinning at each other like a couple of school kids let out on holiday a week early! We can’t believe we are able to live this life and be able to shoot photographs wherever we travel!!
This week we were on Fernandina Beach, Florida staying in Fort Clinch State Campground. More than once we went out to photograph the sunset and tried a lot of creative different types of photography.
Introduction to Better Beach Photography
Beach Photography Tips
Ever wonder why some beach photos look like frozen moments while others show dreamy, misty waves?
Mastering shutter speed is the secret to taking next-level seaside photos — even with basic gear. It’s perfect for vacation photos and being able to preserve your memories beautifully.
Why Shutter Speed Matters in Beach Photography
Shutter speed matters in beach photography. A faster shutter speed will freeze motion, and a slower shutter speed will give you a blur motion.
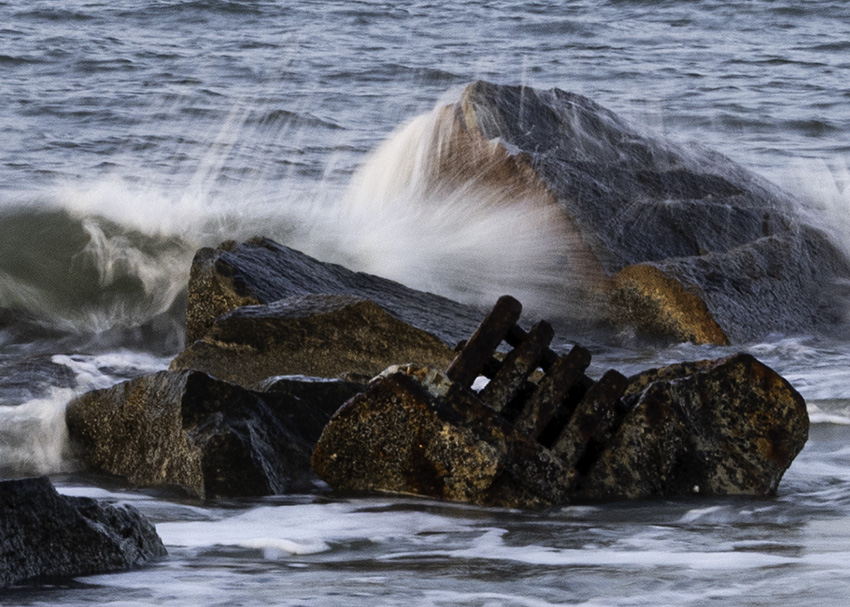
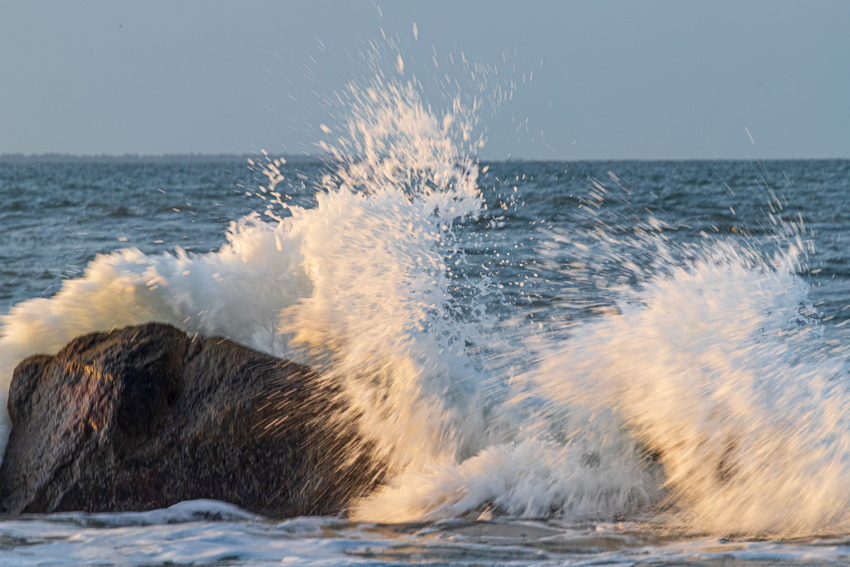
In this first image by Norm, the waves appear frozen, like a crisp splash. He shot this at 1/50th of a second.
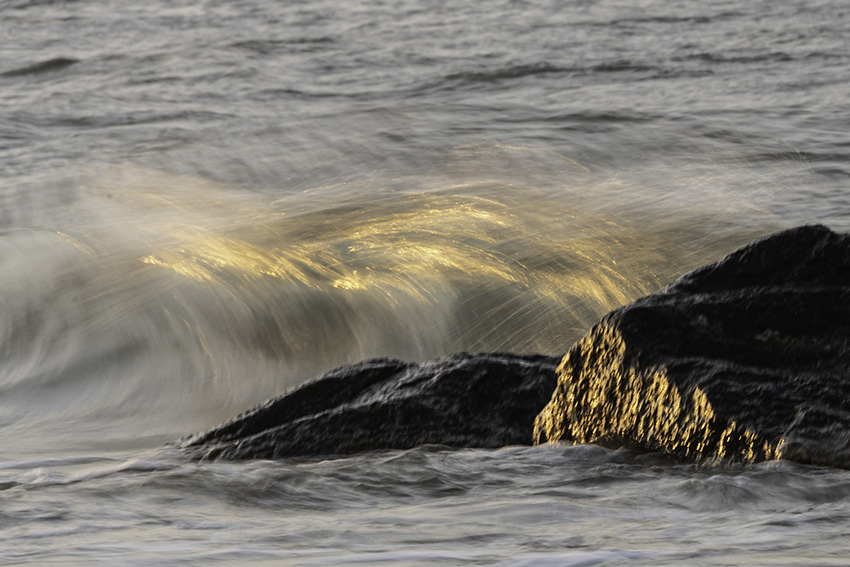
In this second image, the waves appear like a soft, dreamy, silky, flowing mist. Kind of even looks like spun glass in a way. Kathleen shot this image at 1/5th of a second.
Shutter Speed for Ocean Waves
The Two Main Looks You Can Create
Start with these two settings. As with all photography, experimentation is necessary, due to different light conditions, different ISO and different apertures.
A. Freezing the Wave (Fast Shutter Speed)
- Settings to start with: 1/500 sec and faster (up to 1/2000 sec).
- Best for bright, sunny days.
- Tip: Capture splashes, surfers, kids jumping waves.
B. Smoothing the Water (Slow Shutter Speed)
- Settings to start with: 1/4 sec to several seconds.
- Best at sunrise, sunset, or cloudy days (lower light).
- Tip: Use a tripod (or steady surface) to avoid camera shake.
What Gear Helps (Even for Beginners)
Tripod
If you are going for the dreamy, soft look you will need a tripod. Anything below 1/30th of a second, you NEED a tripod. Otherwise, you will get camera shake, especially with the wind at the beach and if you are standing in the surf as the waves make your stance unstable.
Longer focal length lens
A longer focal length lens is very helpful at the beach. You obviously cannot get closer holding camera gear and wading into the surf! The dreamy photo above was shot at 300mm and the crisp, frozen wave was shot using a 200mm lens. Both were telephoto zoom lenses.
Neutral Density Filter
ND (Neutral Density) filter is optional but useful to block light for longer exposures. A neutral density filter helps to lower the exposure level so that you can use a longer shutter speed and get that dreamy effect. The stronger (darker) the ND filter is the lower the exposure that your camera will read. This is a little more advanced. I recommend that you begin with just sunrise or sunset times to begin with, and you don’t need this right away. The color and the side light are much better at this time of day anyway.
Timing
Ever try to time a wave? Well, you can’t fully time the wave patterns, but you can watch and try to predict them. When you see a wave approach the point you want to photograph at, just keep shooting. If your camera has a “burst” mode, utilize that. You just can’t be exact, no matter how much you try.
If you can find a stationary point, focus on that and wait for the wave to come in. In the examples above, we each found a rock to focus on and waited. Then the waves become the unknown factor and you will get some happy surprises, I guarantee it!
If you don’t have a stationary focus point, just back up and get in an overall scene with a larger aperture to get better depth of field and get more area in focus.
Again, the first image below was shot at 1/5th of a second and the second was shot at 1/50th of a second. Huge difference in look, shot the same night!


Remember, you don’t need a fancy camera to photograph the sea. Just manual or semi manual camera controls are necessary. Even some phone apps will work. And you are shooting digital, so just keep trying different settings till you get what you like.
There’s no right or wrong way… just creative choices.
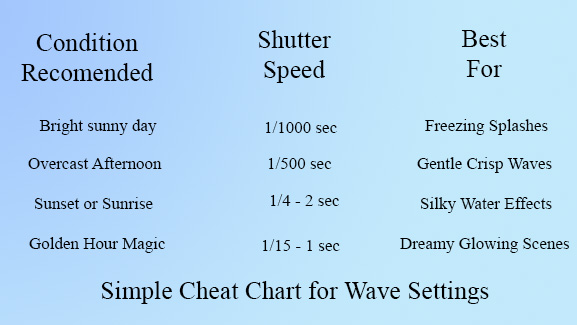
Simple Cheat Sheet for Beach Conditions
Easy Practice Ideas for Your Next Vacation
- Shoot the same wave at different speeds to see the difference.
- Challenge: 10 photos in 10 minutes, changing only the shutter speed.
- Fun idea: Make a “before and after” collage to post on social media! Tag us. #findingnaturesbeauty or #gorgeousadventures. We love to see what creative images you make!
Next time you’re at the beach, you won’t just see the waves… you’ll capture them exactly how you feel.
Rediscover what matters through nature
Feeling Overwhelmed or craving stillness? At Finding Nature’s Beauty, we create space to breathe, reflect and reconnect –with yourself and the world around you. Reflections, our newsletter, is designed to help you find calmness and clarity from the stress of everyday living by providing weekly inspiration, stories, and actionable ideas to guide you.
