Unlock the secret to creating soft, magical backgrounds in your photos—no fancy gear required.
Welcome to my favorite subject – flowers! (Well, not specifically about flowers, but you will need to know this technique to photograph flowers up close.)
It’s spring and all sorts of flowers are coming out now in the wild and in gardens. Prepare yourself to use this technique to help create stunning flower photos.
Welcome to the Beautiful Blur: Why Bokeh Captivates Us
Have you ever taken a photo of a flower or bird and noticed how the background seemed to melt into soft light and color? That, my friend, is bokeh—and once you start noticing it, you can’t stop.
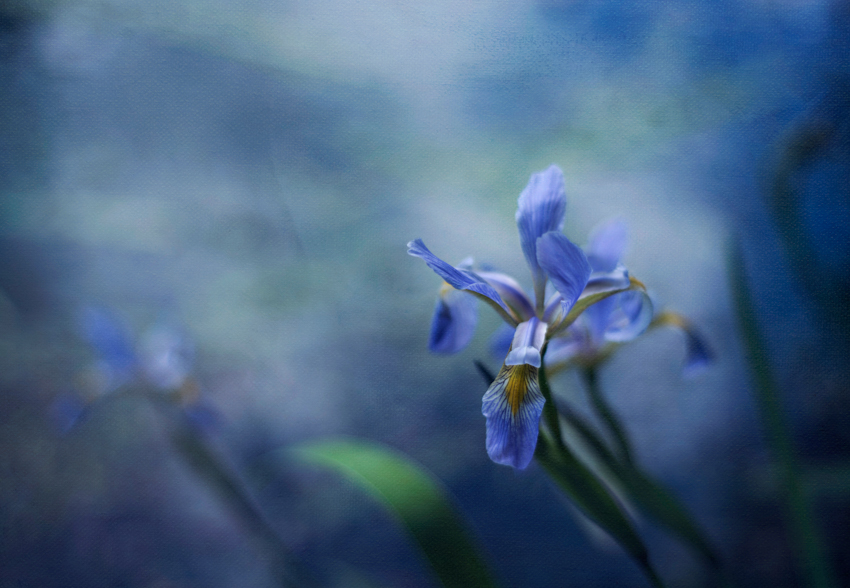
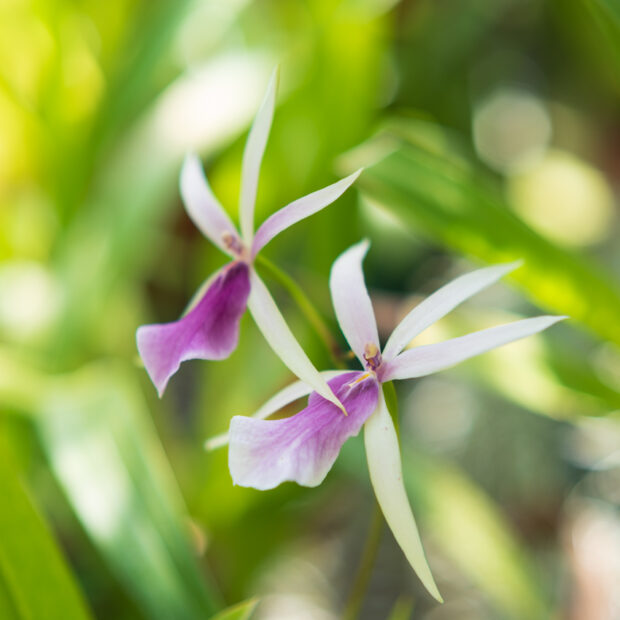
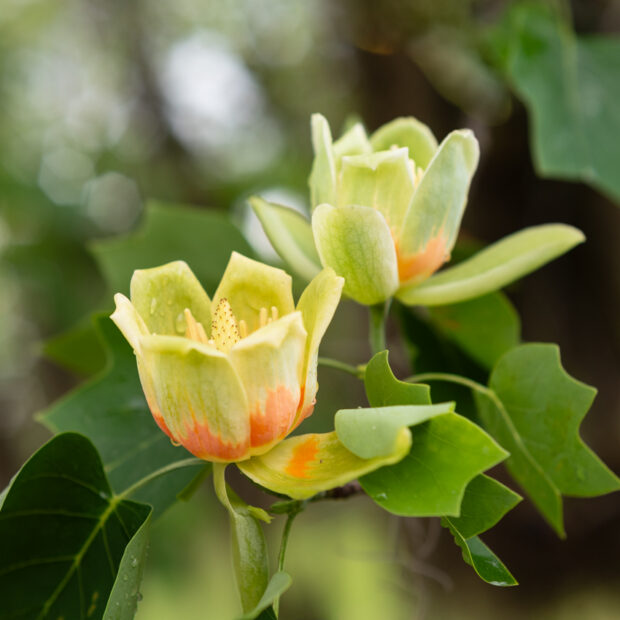
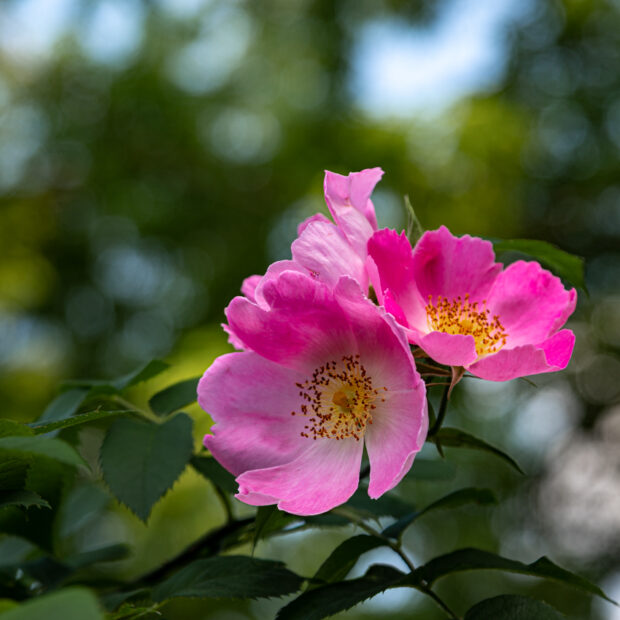
Bokeh is the most beautiful thing to see in a photograph. It only occurs under certain circumstances and shooting parameters. I love using bokeh to enhance macro photography, photographing flowers and plants in nature.
Bokeh (pronounced boh-keh) is the dreamy blur in the background (or foreground) of your photos. It’s what makes a single wildflower look like it’s glowing, or a dew-covered leaf stand out against a wash of soft greens. And the best part? You don’t need the most expensive lens to create it.
In this guide, we’re diving deep into how to use bokeh in nature photography—whether you’re a beginner with a kit lens or a seasoned photographer chasing golden hour light. We’ll keep it simple, practical, and full of joy, just like a walk in the woods with your camera in hand.
What Is Bokeh, Really?
Let’s clear things up: bokeh isn’t just blur—it’s the quality of that blur.
When your camera renders the background out of focus, some lenses turn that blur into soft circles of light, or a painterly wash of color. That’s bokeh. And when it’s done well, it draws attention to your subject and gives your image depth and emotion.
Picture this:
- Sunlight trickling through tree branches behind a hummingbird
- Water droplets sparkling behind a fern after rain
- A bed of daisies softly fading behind a single blooming buttercup
That’s nature’s bokeh at work.
Getting Started: How to Create Bokeh with Any Camera
Don’t worry—you don’t need a high-end camera or a fancy prime lens to get beautiful bokeh. Here’s how to make it happen, even with the gear you already have:
1. Open up that aperture.
Look for the lowest f-number your lens allows—f/1.8, f/2.8, or even f/5.6. Lower numbers = shallower depth of field = more blur.
2. Get close to your subject.
The closer you are to your subject, the more the background will blur.
3. Put some distance between your subject and the background.
Don’t press your subject right up against a wall or tree. Step them forward to let the background melt away.
4. Focus precisely.
Use single-point autofocus to lock in on your subject’s eyes or key detail. The sharper your subject, the smoother the bokeh looks behind them.
5. Find a pretty background.
Backlit leaves, distant flowers, fairy lights, or just a soft wash of green foliage can create stunning blur.
Try this: Take a flower in your garden, kneel down, and shoot it with a wide aperture and the background far away. Watch the bokeh appear like magic.
Level Up: Best Lenses and Camera Settings for Stunning Bokeh
Once you’ve practiced the basics, you might be ready to experiment with gear that really makes bokeh shine.
Lenses to love:
- 50mm f/1.8: A budget-friendly “nifty fifty” lens that’s a bokeh dream. ( be sure to look for the f/1.8, the f/1.4 is significantly more expensive)
- 85mm f/1.8: Great for portraits, but also beautiful for close-ups in nature. (I use this lens almost exclusively for closeup portraits, head-shots, couples or singles. Not group shots!)
- Telephoto zooms (70–200mm): Compress background and isolate your subject. (70 to 200mm zooms are my go to for every day shooting. They are much lighter to carry/hold and work for many different situations)
- I am adding one here that I only recently found out about. I WANT this lens!! I just discovered a macro and flower photographer@ebonnetphoto (on Threads and IG) who uses and old Trioplan lens 100mm f2,8 by Meyer & Gorlitz and produces fabulous images! Check out the bokeh in his posts of flowers. You will be amazed!! This lens will work with modern cameras, you just need to get an adaptor that works with your camera body.
Settings that help:
- Aperture priority mode (A/Av): You set the f-number; the camera handles the rest.
- Manual focus: When you’re shooting through brush or flowers, you might need to fine-tune.
- Lower ISO and fast shutter speed: Keep noise low and avoid motion blur.
Use the light:
Try photographing at golden hour when the light is soft and backlit. Those little bursts of light through leaves? That’s your ticket to beautiful bokeh balls.

Composing with Bokeh: How to Tell a Nature Story Through Blur
Bokeh isn’t just technical—it’s emotional.
It helps you say something with your photos. Here’s how to use it as a creative tool:
- Mood: Soft blur = dreamy, peaceful, romantic.
- Isolation: Draws attention to one flower, bird, or insect by removing distractions.
- Balance: Let background shapes and colors echo your subject for harmony.
- Magic: Add a little light play for bokeh “sparkles” that feel almost fairytale-like.
Pro tip: Try composing with bokeh as a frame—use blurred flowers or grass in the foreground to “hug” your subject in softness.
Want to Get Creative? Try These Advanced Bokeh Tricks
Once you’re confident with the basics, have some fun with these more creative techniques:
- Shaped bokeh: Cut a tiny heart or star into black paper, place it over your lens, and photograph light sources—watch your bokeh turn into shapes!
- Shoot through objects: Leaves, lace, wildflowers—shooting through things can create a dreamy veil effect.
- Vintage lenses: Old manual lenses often have beautiful, unpredictable bokeh. They’re also super fun to experiment with! (I have the most beautiful lenses with my Mamiya C330. They are all prime lenses and I used them to shoot weddings and portraits for many years. They were manufactured in the 1960’s and they have the most beautiful optics!)
- Motion + blur: Try panning with a moving subject or using a slow shutter with intentional camera movement for an abstract feel.
🚫 Troubleshooting: Why Your Bokeh Might Not Be Working (Yet)
It happens. Let’s fix it:
- No bokeh at all? You’re probably too far from your subject or your aperture is too small.
- Busy or harsh blur? Simplify the background or change your shooting angle.
- Subject isn’t sharp? Use a smaller focus point, and hold steady (tripods help!).
Practice Time: Easy Bokeh Exercises You Can Do Today
Try these photo prompts to build your skills:
- Backyard blooms: Focus on a flower with the background far behind.
- Golden hour glow: Capture a leaf or branch with the sun behind it.
- Bokeh at night: Use string lights or candles for sparkle.
- Layer it up: Place something close in the foreground, your subject in the middle, and background far away—create “bokeh layers.”
Final Thoughts: The Art of Seeing Softly
At the heart of bokeh is a simple idea: not everything has to be sharp to be beautiful.
Sometimes, it’s the softness—the blur, the glow, the gentle fade—that helps us see what matters most. Whether you’re photographing a wildflower at dawn or a butterfly in flight, bokeh invites us to slow down, notice the light, and see nature with fresh, wondering eyes.
So go ahead—step outside, bring your camera, and start playing with blur. Who knows what kind of beauty you’ll find when you let the background melt away?
And if you capture something magical, we’d love to see it. Tag your photos with #FindingNaturesBeauty and share them with our community!
Happy shooting -may your bokeh be soft and your light golden!
Quick Bokeh Cheat sheet
- Aperture: f/1.8–f/5.6
- Distance: Get close to your subject, background far away
- Lens: Prime or telephoto lenses work best
- Focus: Use single-point AF or manual focus
- Light: Backlight your subject for sparkly bokeh balls
Rediscover what matters through nature
Feeling Overwhelmed or craving stillness? At Finding Nature’s Beauty, we create space to breathe, reflect and reconnect –with yourself and the world around you. Reflections, our newsletter, is designed to help you find calmness and clarity from the stress of everyday living by providing weekly inspiration, stories, and actionable ideas to guide you.
